https://kerentamir.blogspot.com.au/https://kerentamir.blogspot.com.au/p/publications.htmlhttps://kerentamir.blogspot.com.au/p/past-design-teams.htmlhttps://kerentamir.blogspot.com.au/search/label/videotutorialhttps://kerentamir.blogspot.com.au/p/upcoming-classes.htmlhttps://kerentamir.blogspot.com.au/p/online-workshops.htmlwww.kerentamir.com

Wednesday, January 30, 2013

New Publication in Scrapbooking Memories

You still have time to enter my giveaway


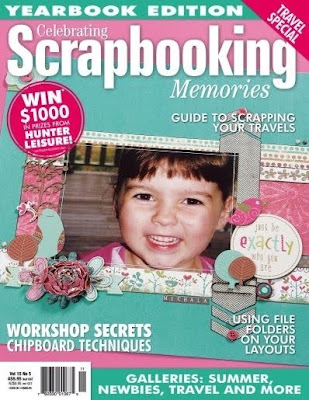
Although all my Aussie Friends already saw this, I was published this month in Scrapbooking Memories Magazine and I just got it in the mail today.

This is the magazine:

Published in the January 2013 issue of this mag!

Here is my layout
and I apologize for the blurriness as I took the pic with my Iphone and its so dark and foggy out.


 along with so many talented scrappy friends:
Helen Tilbury,
Chantal Vanderberg,
Linda Eggleton,
Lizzy Hill,
Lynnda Hosni,
Belinda Spencer,
Gayle Price,
Kim Price,
Sara Groen,
Anita Stokes,
Leonie Neal-Dawson,
Leanne Pearce,
Georgia Heald,
Louise Nelson,
Lindy Gillespie,
Gwen Wruck,
Karen Shady,

and so many more amazing scrappers!!

I hope I didn't forget anyone I know as I went throught hte whole magazine!


Tuesday, January 29, 2013

Family- Inkido GD part 2

You still have time to enter my giveaway!!

Its my turn on the Inkido blog again for part 2 of my Guest Designer spot this month.

I made a layout using beautiful Inkido spring papers. 


I used a family frame from 2 Crafty which I covered in Gesso and then stamped with a marble roller stamp.
I then inked it pink fluid chalk.


For the flower cluster I used lots of flowers from Inkido along with some fussy cut flowers from the actual papers. Then I edged them in gesso to blend it all.


Papercraft Scandinavia är ett grossistföretag som formger och tillverkar unikt material för scrapbooking, korttillverkning och annat pyssel.
Vi designar stämplar, mönsterpapper, spets, blommor och mycket mer i romantisk vintagestil. Våra produkter är av hög kvalitet, inspirerande och fantastiska att skapa med.

Välkommen till oss!http://www.papercraftscandinavia.com/
http://www.inkido.blogspot.com/
*****
Papercraft Scandinavia is a manufacturer that design and make unique material for scrapbooking, cardmaking and other craftings.
We design stamps, patterned paper, lace, flowers and much more in romantic vintage style. Our products are of high standard, inspiring and amazing to create with.

Welcome to us!
http://www.papercraftscandinavia.com/
http://www.inkido.blogspot.com/


You still have a couple of days to enter my giveaway!!
Have a fantastic day!!!


Monday, January 28, 2013

Capture the Joy- New GD at Pion Designs


Please scroll down to see my last reveal for C'est Magnifique's February Kit as I have 2 posts today on the same day and I don't want you to miss either one.

I'm so thrilled to announce that I've been given the opportunity to be an ongoing Guest Designer for Pion Designs. I've been a long time admirer of their beautiful Shabby Chic papers so I was very happy when I got an email a few weeks back asking me to join them.

Here is my first layout. I used the Silent Night Collection to make a snow themed layout.


Here is a picture of my kids experiencing snow in our back yard for the first time this winter. I always think its so beautiful to see the enjoyment in their face when playing in the snow. However I particularly don’t enjoy it. Its too cold for me, and I long for summer days.


I used some chipboard snowflakes for the theme of this layout. I sprayed them in light brown mist and then covered them in glass bead gel to get a snowflake effect.


Materials used:
Silent Night- Guardian angels PD2804
Silent Night- Collage PD2805
Silent Night- Borders PD2810
Silent Night- Tags PD2812
Flowers: Recollections, Manorhouse Creations, Creative Bags, Prima
Snow Flakes: Technique Tuesday
Bling: Zva Creative
Metal Finding and flourish acrylic: Prima
Chain: Tim Holtz
Shimmerz bronze
Glass bead gel
Gesso, Cheese Cloth
Title: K&Co

Hold my Hand- C'est Magnifique reveal part 3


Only three more days to enter my giveaway!!


This is my fourth layout revealed on my blog for C'est Magnifique February Kit:

"Royal Tea Party"


These pictures were taken this past summer by the lake as I was helping my daughter catch minnows with a net.

This was the first layout I designed after my winter holidays. I had so many ideas in my head but I guess I was a little rusty after such a long break. It took me so many hours to design it and no matter what I did I wasn't happy with the final outcome. I got so frustrated with it that I took the whole layout apart and re-built it. I originally had it on a dark blue background and I couldn't figure out what wasn't working for me. I finally lifted the whole layout out and transferred it to the light beige background and then I relaxed.

I really think its important for designers to share their good and bad experiences. Showing how it can be so frustrating sometimes to find the right "look" for your project, the one that makes you happy. However when you finally do, it is so rewarding.


Now I really wanted to share what I did with the Blue Fern frame. As you can see, I cut it in half to frame my two photos at the edge of the paper. I roughly painted it in light blue acrylic and then stamped it with white script. Finally I lightly painted it with brown Shimmerz paint in different areas.


Kit 
Maja Design: Let's Have Some Coffee: TVA FROKNAR
Maja Design: Let's Have Some Coffee: BLOMMOR PA BORDET
Blue Fern: Blue Fern Frame
Prima: Resist Canvas: Swirls
Glitz: Teeny Alphas: Tan

Flower Add-on:
Prima: Coventry: Serene
Prima: Botanical: Marri 
Manor House Creations: Romance

Embellishment Add-on:
Leaky Shed: Keyholes
American Crafts: Thickers: Rainboots
Prima: Craftsman: Velvet Trinkets

From My Stash
Martha Stewart Punch
Glitz Script Stamp
Blue acrylic paint
Color box white ink
Pear pen-brown, ice-white
Shimmerz Pearlz- brown, ice blue

Hope you have a wonderful day!!

Sunday, January 27, 2013

That Look- C'est Magnifique Reveal Part #2

For my Giveaway press here

Here is my 3rd layout for the February Kit at C'est Magnifique.

"Royal Tea Party"


My daughter can make such funny faces and she makes me laugh all the time. I love her sense of humor and how she can find happiness in all the little things. I took this picture of her and when I asked her to look at the camera she just made this funny face.


I stenciled a large flourish in the background with some gesso and then painted it in Ice blue Shimmerz Paint. Then I dabbed some raspberry acrylic paint dabber.

I painted the white Prima flowers in blue using the same Shimmerz paint to match the layout.
.

I used the Dress Form chipboard from Blue Fern Studios. I covered it in Gesso and then dabbed it with Ice Blue Shimmerz paint, Rasberry acrylic paint dabber. I added some lace at the waste and a little flower.

I also used the BF packaging under the layout and I fussy cut the flowers to balance the pink tones in the layout.


I used some cheese cloth around the layout to soften the look!! I truly love this look.


Kit 
Maja Design: Let's Have Some Coffee: BJORNBARSKAKOR
Maja Design: Let's Have Some Coffee: CHAITE
Prima: Resist Canvas: Swirls
Glitz: Teeny Alphas: Tan
Cheep Trims: Lace

Flower Add-on:
Prima: Coventry: Serene
Prima: Larkspur: Sherwood Rose
Manor House: Lotus: Imperial

Embellishment Add-on:
Blue Fern Studios: Sweetheart Dressform and packaging
American Crafts: Thickers: Rainboots

From my stash
Gesso, Cheese cloth
Cricut Frame Cartrige
Shimmerz paint ice blue
Acrylic paint dabber: rasberry
Stencil Magic Accents


I hope you all have a fantastic day!!


Saturday, January 26, 2013

Pure Bliss- C'est Magnifique Reveal Part 1

Only a few days left for my giveaway here


We are so pleased to reveal our February Kit at C'est Magnifique.

"Royal Tea Party"

I love these pictures I took by the lake. They look so magical as if my kids are in a enchanted forest. I loved framing them in the Purple hearts. I used purple and green tones for this layout and had vines growing out of the photos.


I tried to make this layout looking like a magical forest. I stenciled the large flower vine with Martha Stewart Paste and then colored it with the purple color shine from the kit.


I used the Prima hearts as frames for my pictures. I think they look so adorable


Here are some close-ups of the Kit

Image

Image

Image

Image

Image
Kit 

Maja Design: Let's Have Some Coffee: BJORNBARSKAKOR

Maja Design: Let's Have Some Coffee: SODERS HOJDER

Prima: Songbird Vine: Purple
Glitz: Teeny Alphas: Tan
Heide Swap: Color Shine: Amethyst

Flower Add-on:
Prima: Amore Violet
Prima: Botanical: Marri 
Prima: Larkspur: Sherwood Rose
Manor House: Lotus: Imperial

Embellishment Add-on:
American Crafts: Thickers: Rainboots
Tattered Angels: Chalkboard: Fern

From my stash
Martha Stewart Textured paste
Purple chalk ink
Purple pearls
Stencil magic accents


If you would like to purchase these papers or embellishments, come by the C'est Magnifique store.

Have a wonderful day!!

Friday, January 25, 2013

Believe


Here is a new layout I made with the new Marigold collection from Kaisercraft.
I used Saturday Sketch #2 for January as an inspiration for this layout.

There's also something different in this layout from all my other layouts!! 
Can you tell what's different about this layout from all the rest??
Scroll down to see the answer!!


I framed my son's picture in one of those beautiful flourish frames and then I used other ones to spread across the page.


I made a layered banner using those frames too!!
At the end, I spread some Martha Stewart paste over a brick stencil by the edge of the paper. 


Did you guess what was different???
For the first time, I made a shabby chic layout without using any silk or satin flowers. I only used paper and stickers on this layout can you believe it?? 
I wanted to add flowers but I felt it was perfect the way it was.


Materials used:
Kaisercraft: Marigold Paper Collection
Kaisercraft Marigold Sickers and Die-cuts
Martha Stewart Textured paste
Crafter"s workshop brick template
Shimmerz paints


Thursday, January 24, 2013

Just Be You- 2 Crafty Reveal Part #2


For my giveaway press here


Its my turn to show case my 2 Crafty creations I'm really excited about it!!

I love this picture of my son, he is so adorable here.


I used the Prima BAP sketch this month as an inspiration for this layout.
I added lots of texture and layers. 


First lets talk about the Frame Flourish 2.  I love framing my pictures now and this frame was perfect for this photo. I covered it in glass bead gel and then painted it with different Shimmerz paints.

Frame Flourish 2 (units of 3)


The second 2 Crafty chipboard I used was this Corner Wispy Vines. I cut it in half and used it in two different places. Then I simply sprayed it in black ink and stamped some white writing on it.

Corner Whispy Vines (units of 3)


Finally I used 2 mini bird houses with their respective bird and the title Just be You. I covered the title in glass bead gel and then sprayed and inked it until it had a lot of texture.

Birdhouse (unit of 3)

Just Be You (unit of 3)


Have a fabulous day!!!


Tuesday, January 22, 2013

Free Spirit- My 2 Crafty January Creation Part #1


For my giveaway press here


Free Spirit

This is one of my favourite layouts of all times.
This picture of me was taken this past  December during our trip to Florida.
I love the beach, the fresh air and the sound of the waves make me so calm and relaxed.


One of my favourite things about this layout is the color scheme. 
I used the color palette from Prima's PPP and the monthly challenge at OUAS.
For the journaling component of the OUAS challenge I wrote all my new hopes and dreams for 2013 all around the page in a white pen. 

I'm also using this layout for the January challenge at Another Freaking Scrappy challenge about New Years resolutions. Which I've written all over this layout. Some are even hidden. 


You can see in this close-up a few 2 Crafty Chipboard pieces. First you can see the Frame Nella's. I also covered it in glass bead gel and painted it in dark blue Shimmerz paint.

The second piece is the Compass which I simply dabbed in chalk ink.

Then I used the Doves which I painted in light blue acrylic and dabbed with dark blue ink.

Frame Nella's (unit of 3) Compass (units of 3) Doves (unit of 3)


Finally I want to show you my favourite part of this layout: the chipboard hexagons. I first covered them in gesso. Then using a chicken wire stencil I masked the pattern with Martha Stewart Textured paste. I also sprinkled some blue beads on top while the paste was wet. At the end I dabbed the textured area with my acrylic paint blue dabber.

1.5 inch Hexagons  (units of 3)


Materials used
2 Crafty chipboard
Prima: Firefly and Fairybelle collection
Prima flowers and alphas
Gesso, beads, Cheese cloth. Seashells
Shimmerz sprays and paints
Crafters Workshop Template
White pen
Fluid chalk ink: sand
Martha Stewart Textured paste
Light blue acrylic paint dabber


I hope you enjoyed my post today. For more ideas with these products please visit the 2 Crafty blog and don't forget our Design Team Call.